Concepts in GoCD
This page explains some of the underlying concepts of GoCD. If you want to know more about Continuous Integration and Continuous Delivery, in general, you can refer to Martin Fowler’s articles on the subject: Continuous Integration and Continuous Delivery.
If you’re very new to GoCD, the Getting Started Guide is a good starting point to get a good understanding of the concepts while trying them out on a real GoCD instance.
Index
- Task
- Job
- Stage
- Pipeline
- Materials
- Pipeline Dependencies
- Fan-in and fan-out
- Value Stream Map
- Artifacts
- Agent
- Resources
- Environment
- Environment Variables
- Templates
Task
A task, or a build task, is an action that needs to be performed. Usually, it is a single command.
The task shown in the image below is set to run the command ant -Dmodule=A compile, when executed by GoCD.

Job
A job consists of multiple tasks, each of which will be run in order. If a task in a job fails, then the job is considered failed, and unless specified otherwise, the rest of the tasks in the job will not be run.
The job shown in the image below has three tasks. The ant task will be run first, followed by the rake task and finally, the shell script is run.
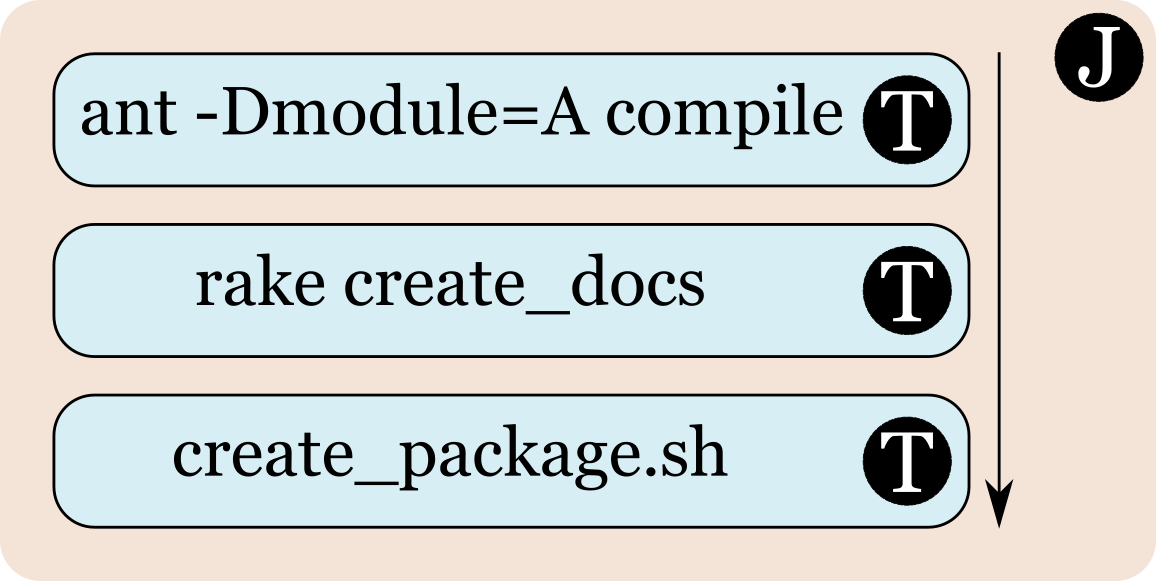
Every task in a job is run as an independent program, and so, changes made by a task to any of its environment variables will not affect subsequent tasks. Any changes made by a task on the filesystem will be visible to subsequent tasks.
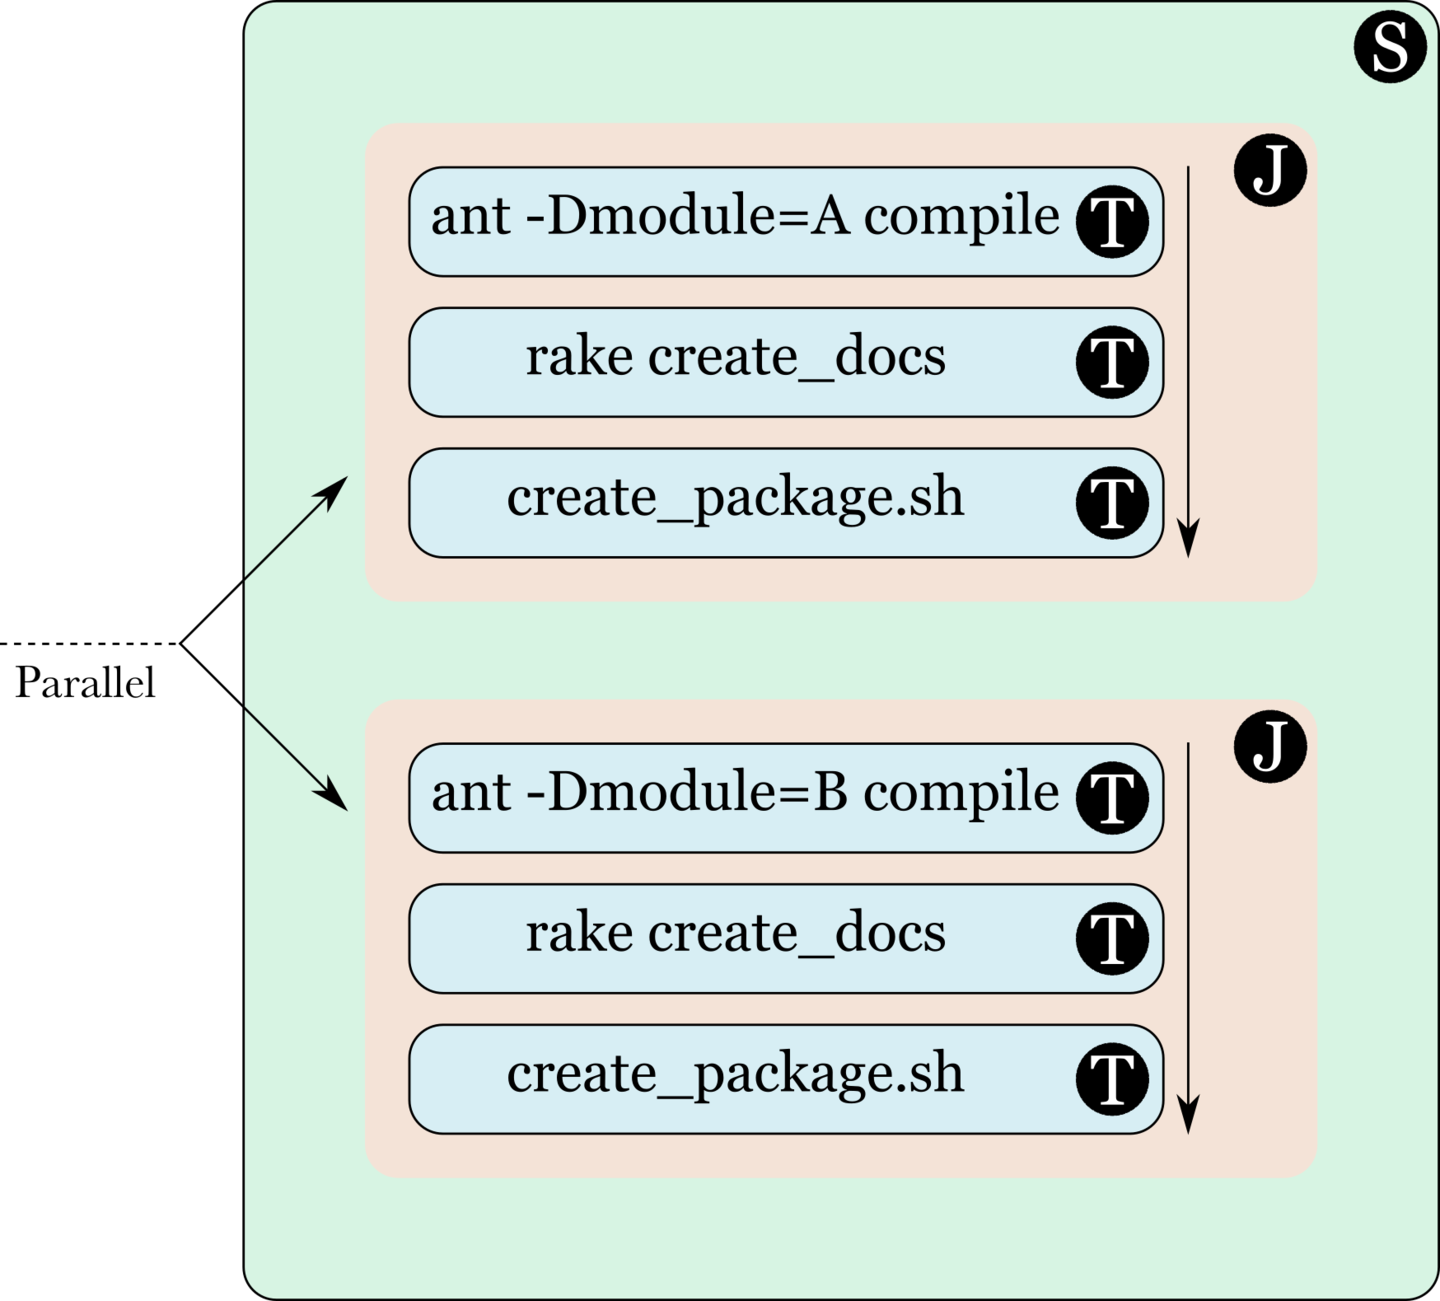
Stage
A stage consists of multiple jobs, each of which can run independently of the others. This means that GoCD can and does parallelize the execution of jobs in a stage. If a job fails, then the stage is considered failed. However, since jobs are independent of each other, the other jobs in the stage will be run to completion.
The stage shown in the image below has two jobs, one which builds module A and another which builds module B. The success or failure of the first job cannot affect the success or failure of the second.
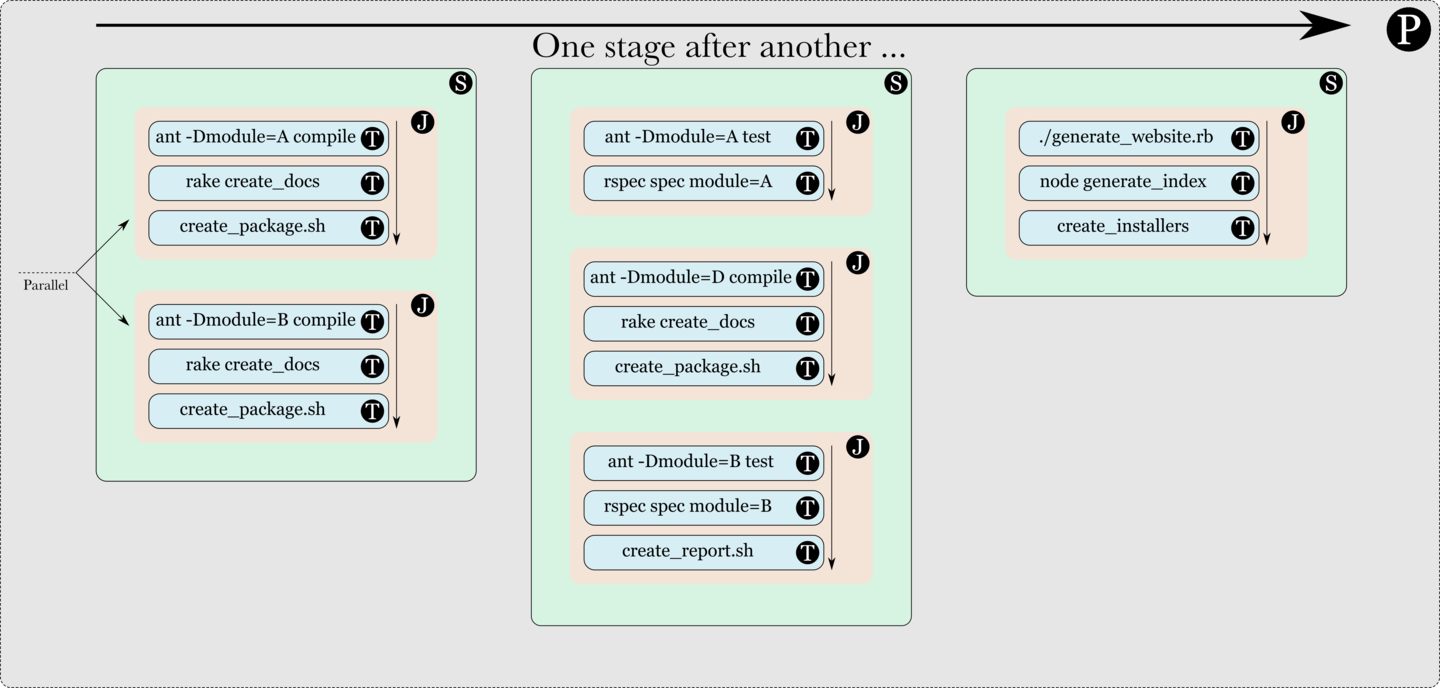
Pipeline
A pipeline consists of multiple stages, each of which will be run in order. If a stage fails, then the pipeline is considered failed and the following stages will not be started.
The pipeline shown in the image below has three stages, the first with two jobs, the second with three and the third with one. If the first stage fails, then the second and third stages will not be run.
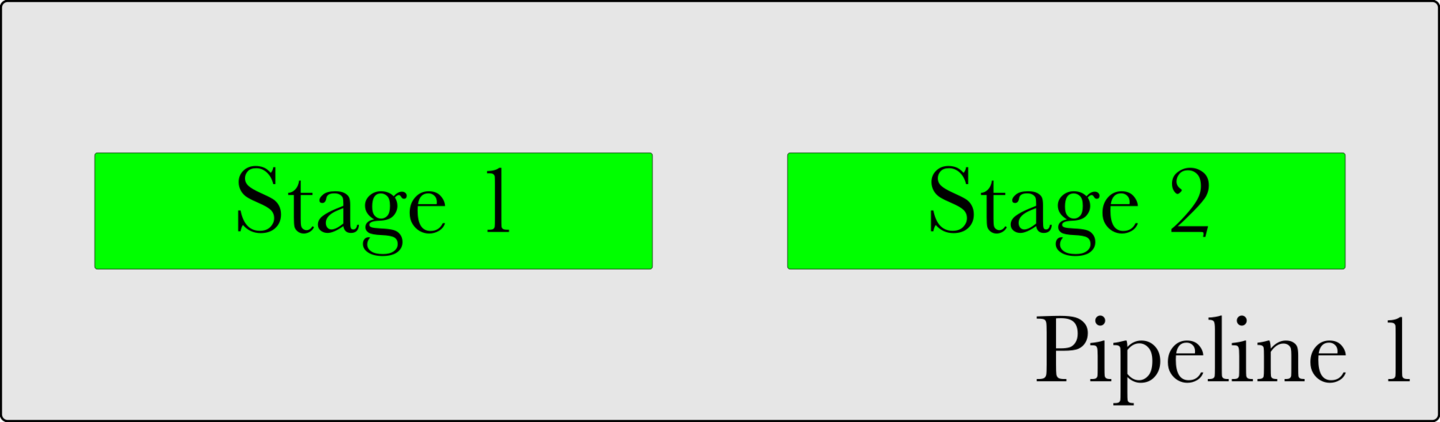
Since an image of a pipeline can get quite big, the rest of this document will use a slightly smaller representation of a pipeline, which hides the jobs and tasks. This representation is shown below.
Materials and triggers
(or “When do these tasks, jobs, stages and pipelines run?”)
A material is a cause for a pipeline to run. Often, it is a source code material repository (Git, SVN, Mercurial, etc). The GoCD Server continuously polls configured materials and when a new change or commit is found, the corresponding pipelines are run or “triggered”.
There are different kinds of materials. Here’s an example of a Git material. When a commit is made to the repository configured in the Git material, the pipeline gets triggered.

Similarly, an SVN material is shown below. GoCD has support for many different kinds of source code materials, as well as a plugin endpoint for extending the kinds of materials it supports.

A “timer trigger” is a special kind of material that triggers a pipeline at a specified time, or at specified intervals.

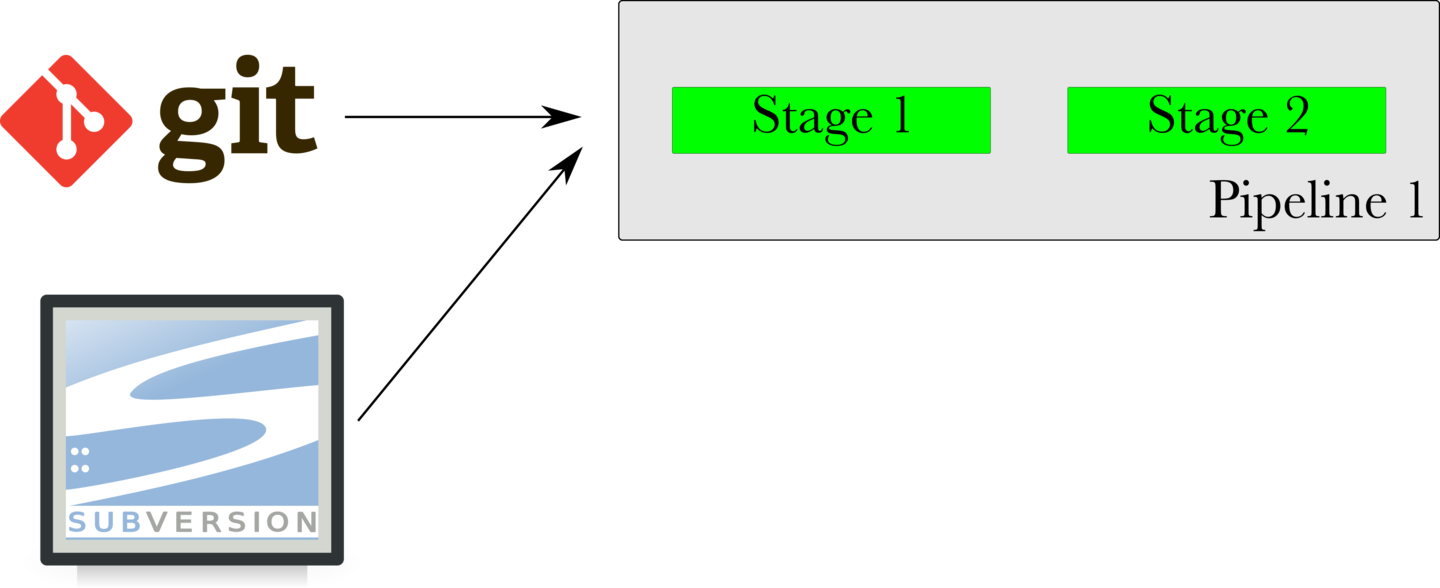
A pipeline can even be configured with multiple materials. The pipeline shown below is configured with a Git material and an SVN material. When either repository has a new commit, the pipeline is triggered.
Pipeline dependency material
Materials really start becoming powerful when a stage in a pipeline is used as a material for another pipeline.
In the image shown below, Stage 2 of Pipeline 1 is configured as a material for Pipeline 2. Whenever Stage 2 of Pipeline 1 finishes successfully, Pipeline 2 triggers. In a setup such as this, Pipeline 1 is called the Upstream Pipeline and Pipeline 2 is called the Downstream Pipeline. Stage 2 of Pipeline 1 is called the Upstream Dependency of Pipeline 2.

Any stage of a pipeline can be used as a material. In the image shown below, as soon as Stage 1 of Pipeline 1 finishes successfully, Pipeline 2 will trigger and start. Now, both Stage 2 of Pipeline 1 and Stage 1 of Pipeline 2 can run simultaneously.

Fan-out and fan-in
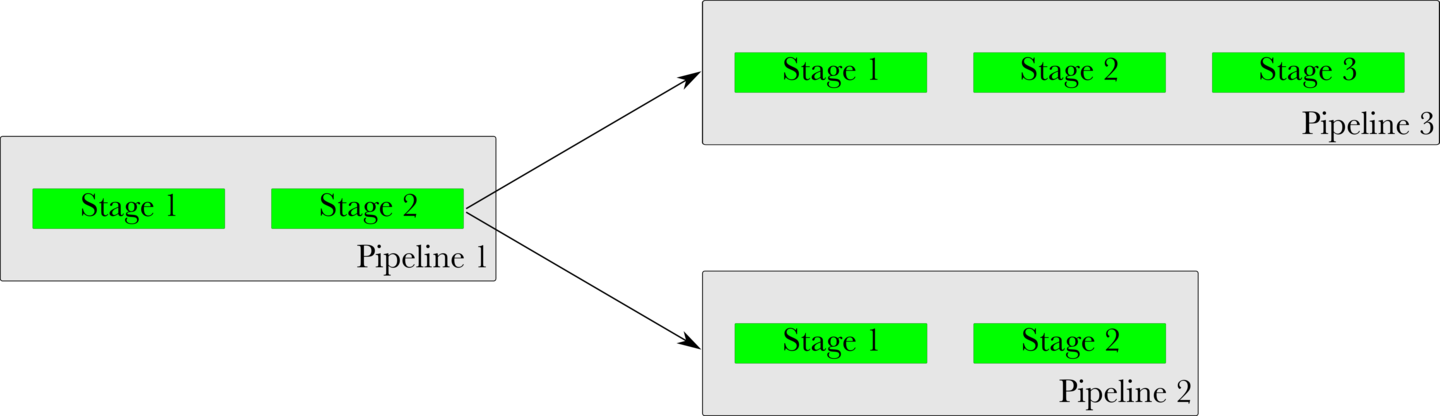
A material is said to “fan-out” to downstream pipelines, when the material’s completion causes multiple downstream pipelines to trigger, as is shown in the image below. The cause of a fan-out need not always be a pipeline dependency material. It can be any material.
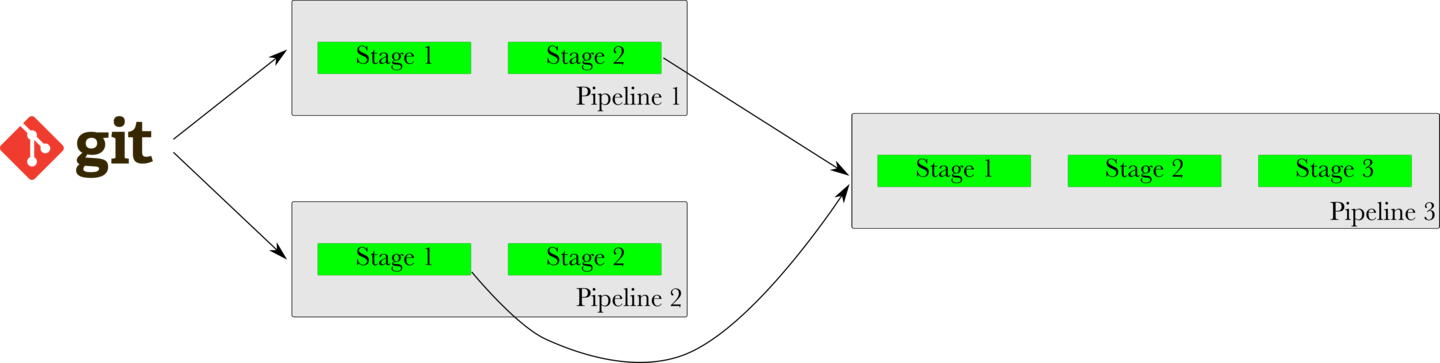
A “fan-in” is when multiple upstream materials are needed to trigger a downstream pipeline, as shown in the image below. One important and interesting aspect of fan-in is that GoCD will ensure that the revisions of upstream pipelines are consistent, before triggering a downstream pipeline.
In the image shown below, this means that if Stage 2 of Pipeline 1 is slow and Stage 1 of Pipeline 2 is quick, Pipeline 3 will wait for Pipeline 1 to finish before triggering. It will not trigger with an inconsistent or old revision of Pipeline 1, just because Pipeline 2 finished quickly.
Value Stream Map (VSM)
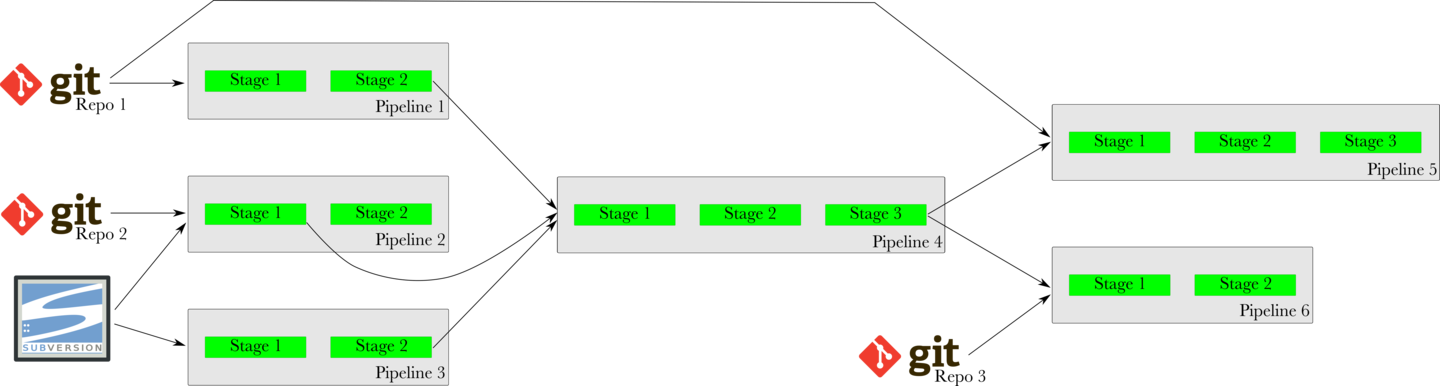
The Value Stream Map (VSM) is an end-to-end view of a pipeline, its upstream dependencies and the downstream pipelines it triggers. When deciding which pipelines to trigger, GoCD’s fan-in and fan-out resolution will take care of all the dependencies consistently.
For instance, in the image below, when a new commit is found in Repo 1 (git), GoCD will not trigger Pipeline 5 immediately. It will wait for Pipeline 1 to trigger and finish successfully, then it will wait for Pipeline 4 to trigger and finish successfully. Finally, it will trigger Pipeline 5 with the same revision of Repo 1 that was used with Pipeline 1.
Artifacts
Every job in Go can optionally publish “Artifacts”, which are files or directories. After the job is run, GoCD will ensure that the specified artifacts are published and made available to the user, and other downstream stages and pipelines.
A representation of artifacts is shown below. As shown, every job can have artifacts. In this case, the job on the top has two files and a directory as its artifacts and the job below it has two directories and a file as its artifacts.

Fetching artifacts
GoCD provides a special task called a “Fetch Artifact Task”, which allows artifacts to be fetched and used, from any ancestor pipeline - that is, any pipeline that is upstream of the current pipeline. GoCD will ensure that the correct version of the artifact is fetched, irrespective of anything else that might be going on in the system.
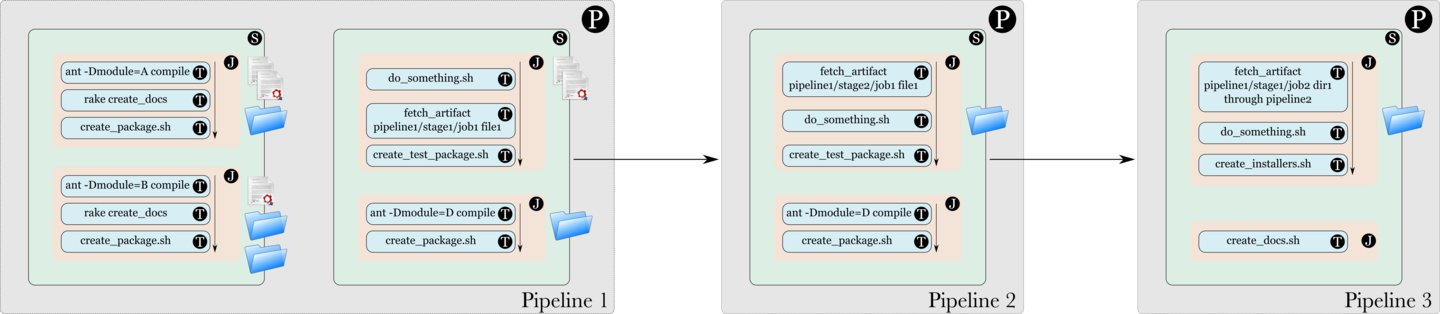
In the image shown below, the jobs in Stage 1 of Pipeline 1 publish some artifacts. In Stage 2, a Fetch Artifact Task fetches the artifact published in Stage 1. Then, in Pipeline 2, a Fetch Artifact Task fetches an artifact published in Pipeline 1. Finally, in Pipeline 3, which is further downstream, a Fetch Artifact Task fetches an artifact from Pipeline 1, through Pipeline 2.
Agent
(or “Where do these tasks, jobs, stages and pipelines run?”)
GoCD Agents are the workers in the GoCD ecosystem. All tasks configured in the system run on GoCD Agents. The GoCD Server polls for changes in material (this happens on the GoCD Server itself) and then, when a change is detected and a pipeline needs to be triggered, the corresponding jobs are assigned to the agents, for them to execute the tasks.
Agents pick up jobs which are assigned to them, execute the tasks in the job and report the status of the job to the GoCD Server. Then, the GoCD Server collates all the information from the different jobs and then decides on the status of the stage.
An agent is represented by a monitor in the image below.

Resources
Agents and jobs can be enhanced with “Resources”. Resources are free-form tags, that help Go decide which agents are capable of picking up specific jobs.
In the image below, the Firefox® and Tux icons represent resources on the agent. The resources can be thought of as the agent broadcasting its capabilities. Resources are defined by administrators and can mean anything the administrators wants them to mean. In this case, it might be an indication that this agent has Firefox installed for running functional tests and it is a Linux box.

Resources become very useful, when jobs are assigned resources. In the case of jobs, resources can be thought of as the capabilities they need in an agent, for them to be run successfully.
In the image below, Job 1 claims that it needs an agent with the Firefox® resource. Job 2 claims that it needs an agent with the Linux® resource. Job 3 claims that it needs an agent with both Firefox® and Linux® resources. Job 4 claims that it doesn’t need any resources.

In the case of the image above:
-
Job 1 can be assigned to either Agents 1 or 3, by the GoCD Server.
-
Job 2 can be assigned only to Agent 1 (since it is the only agent to provide the Linux resource).
-
Job 3 can be assigned only to Agent 1 (since it is the only agent to provide both those resources).
-
Job 4 can be assigned to any of the three agents, since that job needs no special resource matching.
Note that the fact that Agent 3 has an Apple® resource does not stop it from being assigned a job. It just happens to be a resource which is not needed by any of the jobs shown.
Environments
An “Environment” in GoCD is a way to group and isolate pipelines and agents. The rules of an environment are:
-
A pipeline can be associated with a maximum of one environment.
-
An agent can be associated with multiple environments or no environments.
-
An agent can only pick up jobs belonging to pipelines in environments that it is associated with.
-
An agent which is associated with an environment cannot pick up jobs in pipelines which are not associated with any environment.
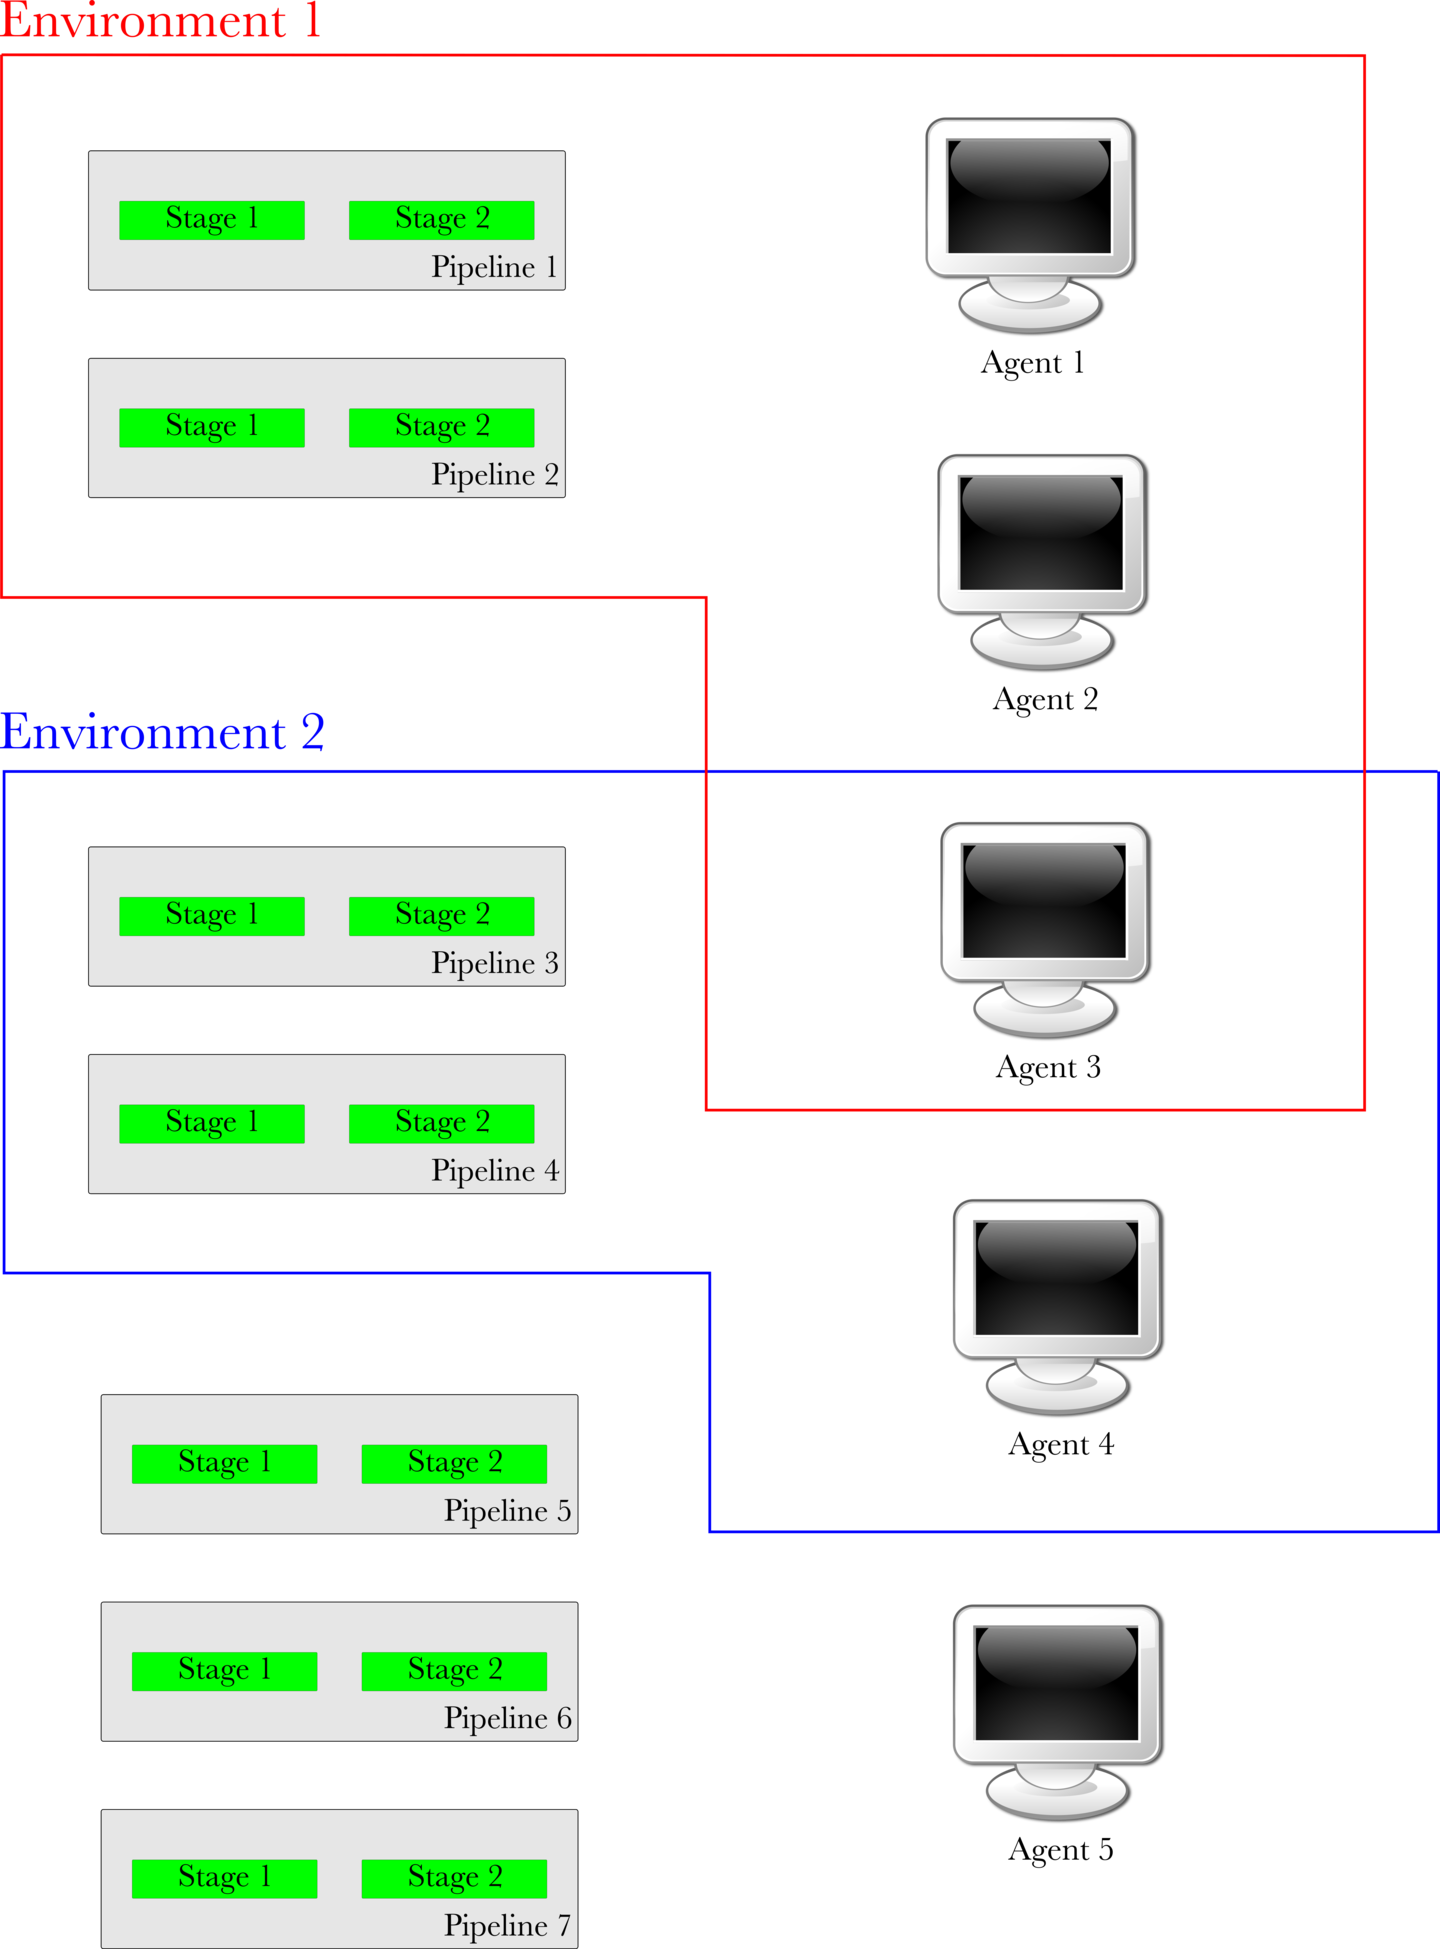
In the image below representing environments, Environment 1 is composed of Pipeline 1, Pipeline 2, Agent 1, Agent 2 and Agent 3. Environment 2 is composed of Pipeline 3, Pipeline 4, Agent 3 and Agent 4. Pipelines 5, 6 and 7 and Agent 5 do not belong to any environment.
In a case such as the image shown above:
-
Jobs in Pipelines 1 and 2 can only be picked up by Agents 1, 2 and 3.
-
Jobs in Pipelines 3 and 4 can only be picked up by Agents 3 and 4.
-
Jobs in Pipelines 5, 6 and 7 can only be picked up by Agent 5.
In addition to the restrictions related to matching of Environments, resources need to match between the agents and jobs, as detailed in the section on Resources.
Environment Variables
Environment variables are often confused with “Environments”. They’re not directly related. In GoCD, “Environment Variables” are user-defined variables that are defined in the configuration. These environment variables are made available to tasks just like other environment variables available to processes when they run in an operation system.
Environment variables can be defined at multiple levels: Within environments, within pipelines, within stages and within jobs. They follow a cascading system where environment variables defined at the “Environment” level get overridden by environment variables defined at the pipeline level and so on.
In the image shown below, there are 4 environment variables defined at the environment level, 3 at the pipeline level and 2 each at the stage and job levels.
The environment variable, ENV_ENV has been set to a value of 1 at the environment level, ENV_STG has been set to 2 at pipeline level and so on.
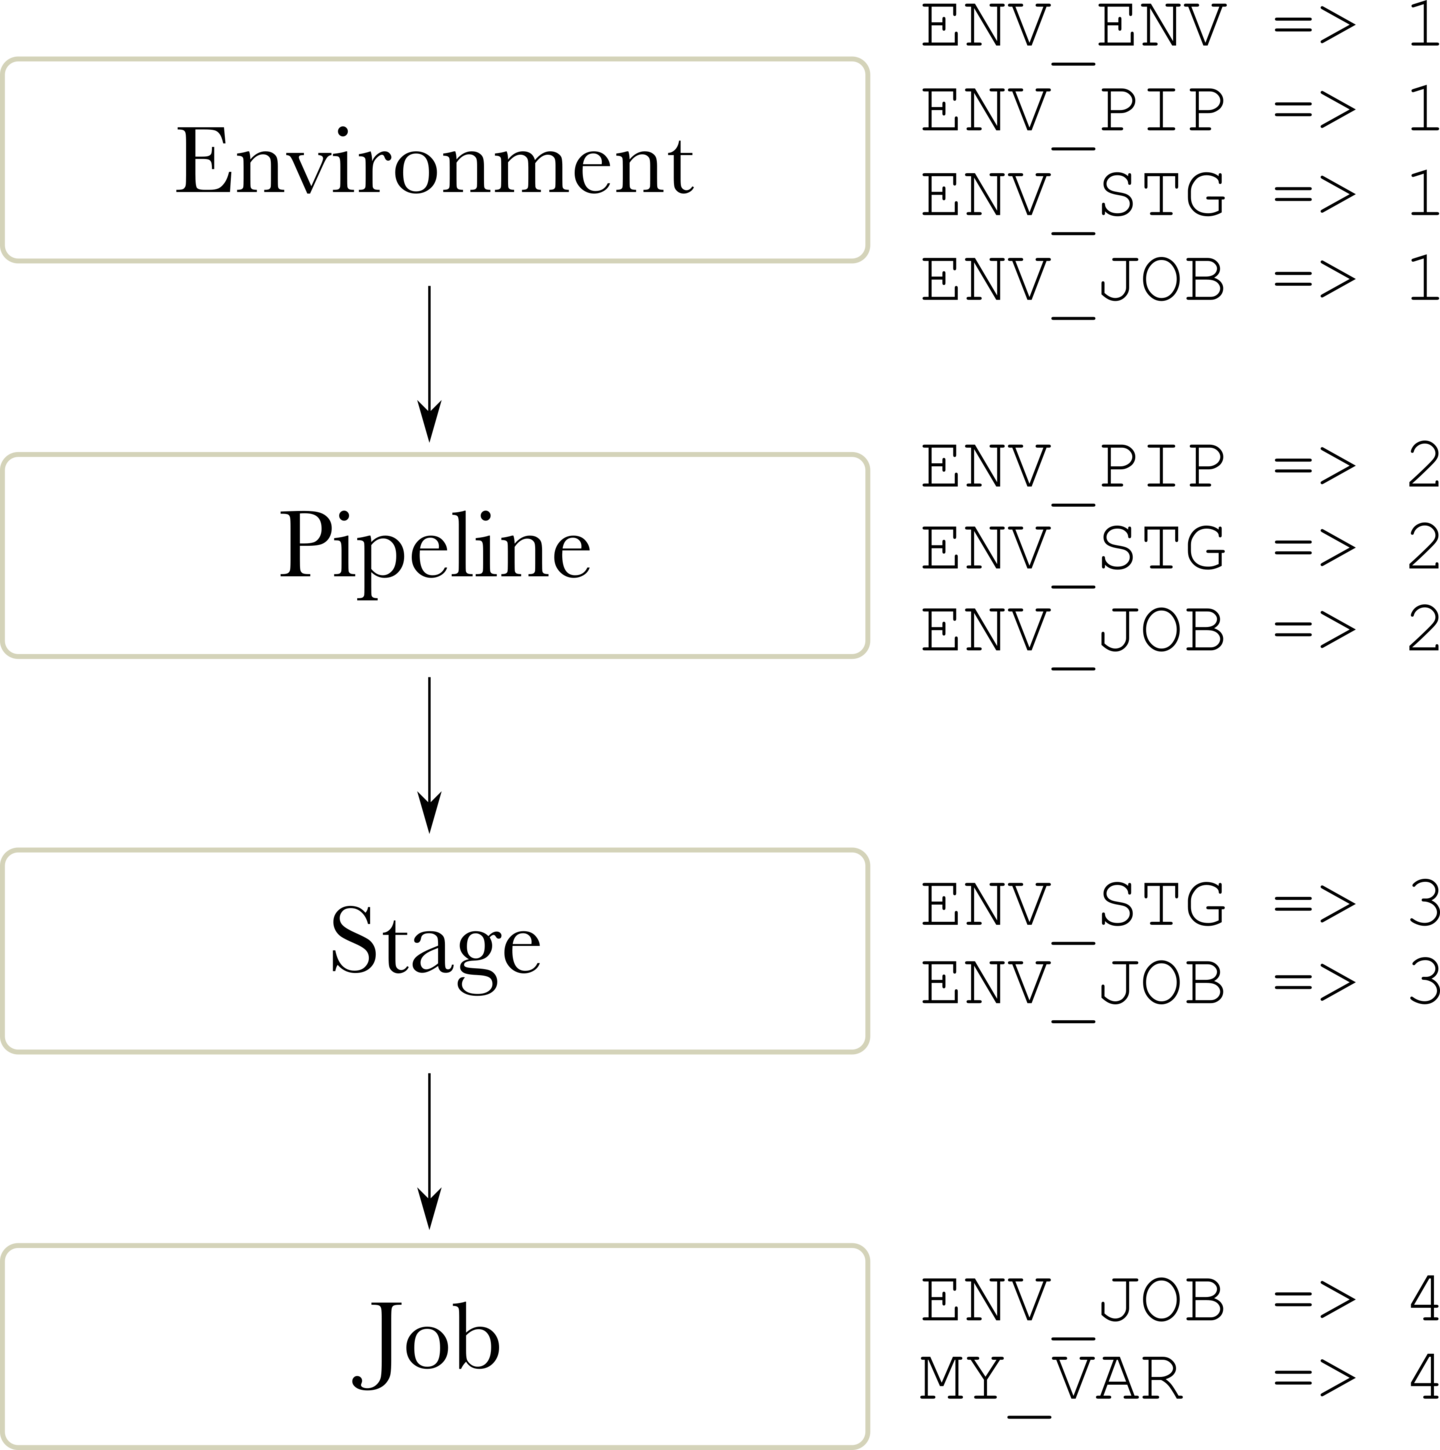
The environment variables provided to every task in this job will be:
ENV_ENV => 1
ENV_PIP => 2
ENV_STG => 3
ENV_JOB => 4
MY_VAR  => 4
For instance: ENV_PIP set at the environment level (to a value of 1) is overridden by ENV_PIP set at the pipeline level (to a value of 2). Since ENV_PIP
is not defined at the stage and job levels, the value of ENV_PIP will be 2. The other environment variables can be reasoned about in the same way.
Templates
Templating helps to create reusable workflows in order to make tasks like creating and maintaining branches, and managing large number of pipelines easier.
Pipeline Templates can be managed from the Templates section from the Admin menu.
 Suggest edits to this page